For grading exams and problem sets, my graders and I use a special Google Spreadsheet. It’s a good system we have enjoyed for many years, and I don’t think I’m ever going back.
You can use it too: just copy the Grading Sheet template.
It’s fairly self explanatory, but read on if you are inclined to be convinced, or want to learn more.
Why this custom Google Sheet exists
When grading assignments, I find it hard to decide how much to penalize each type of mistake:
- It’s important to penalize the same mistake in the same way for everyone.
- Yet it’s only as you start grading that you discover the various mistakes the students make.
- Especially in the beginning, it’s hard to commit to what the penalty should be.
- Things get bad if you change your mind and have to revisit all copies.
- It’s even harder for teams of graders or inexperienced graders, as they may require lots of real-time communication.
This suggests there is value in a system that allows you to list mistakes as they appear, while allowing you to postpone the decision of how much to penalize them.
Outline of the workflow
To address the stated pain point, we’ve been using a system that allows for the following flow. There is minimal setup:
- First list the students, optionally grouped.
- Then list the problems (e.g., Q1, Q2, …).
- The system creates one sheet per problem, and lists each student/group as a row in each sheet.
Then, as you grade:
- You annotate reports with feedback, but without numeric grades, and you keep track in the sheets.
- Every time you discover a new type of mistake, you create a new column in the problem’s sheet: this is for internal use, students won’t see it.
- Now or later, you decide the associated penalty (this can be changed anytime).
- If a student/group made a particular mistake, put a
1in the corresponding cell (or possibly0.5if they had redeeming qualities).
Once grading is done, you can review the penalties before sending out automatic e-mails to each student/group with a detailed breakdown of their grade, and optionally a link to their annotated report.
What I like about it
These are some of the features (by design or serendipity):
- Students can submit individual reports or group reports (arbitrary group sizes).
- A team of graders can work simultaneously. The whole team can track progress.
- If you re-use an assignment but the graders have changed, the new graders can see precisely how grading was done the last time.
- You can see clearly if a particular type of mistake was surprisingly common.
- If an issue with the grading occurs after the fact, it’s easy to make some changes in the sheets and re-send the e-mails.
- Graders do not get slowed down by the hard task of choosing penalties: these can be filled in or changed at any time.
- The automated e-mails can be tuned with a template.
Moreover, students can be given an individual bonus or malus, and a reason for it can be included in the e-mail. This may be useful if you conduct individual oral exams after group projects for example.
Additionally, if you have several assignments during the semester with the same students, it’s ok for them to change groups: you get a clean list of individual students and their grades for each grading sheet, so it’s easy to combine them in the end.
Step by step: how to use it
For each assignment, copy the Grading Sheet template.
You will see two sheets (Students and Problems) with colored cells:
Green cells : fill these in once at the start, then freeze them with two checkboxes.
Blue cells : fill these in whenever you want, and edit at will.
Yellow cells : their contents are computed automatically, do not edit.
The checkboxes trigger the creation of more sheets: Emails, Totals, and one sheet per problem.
Setup: list students (and groups)
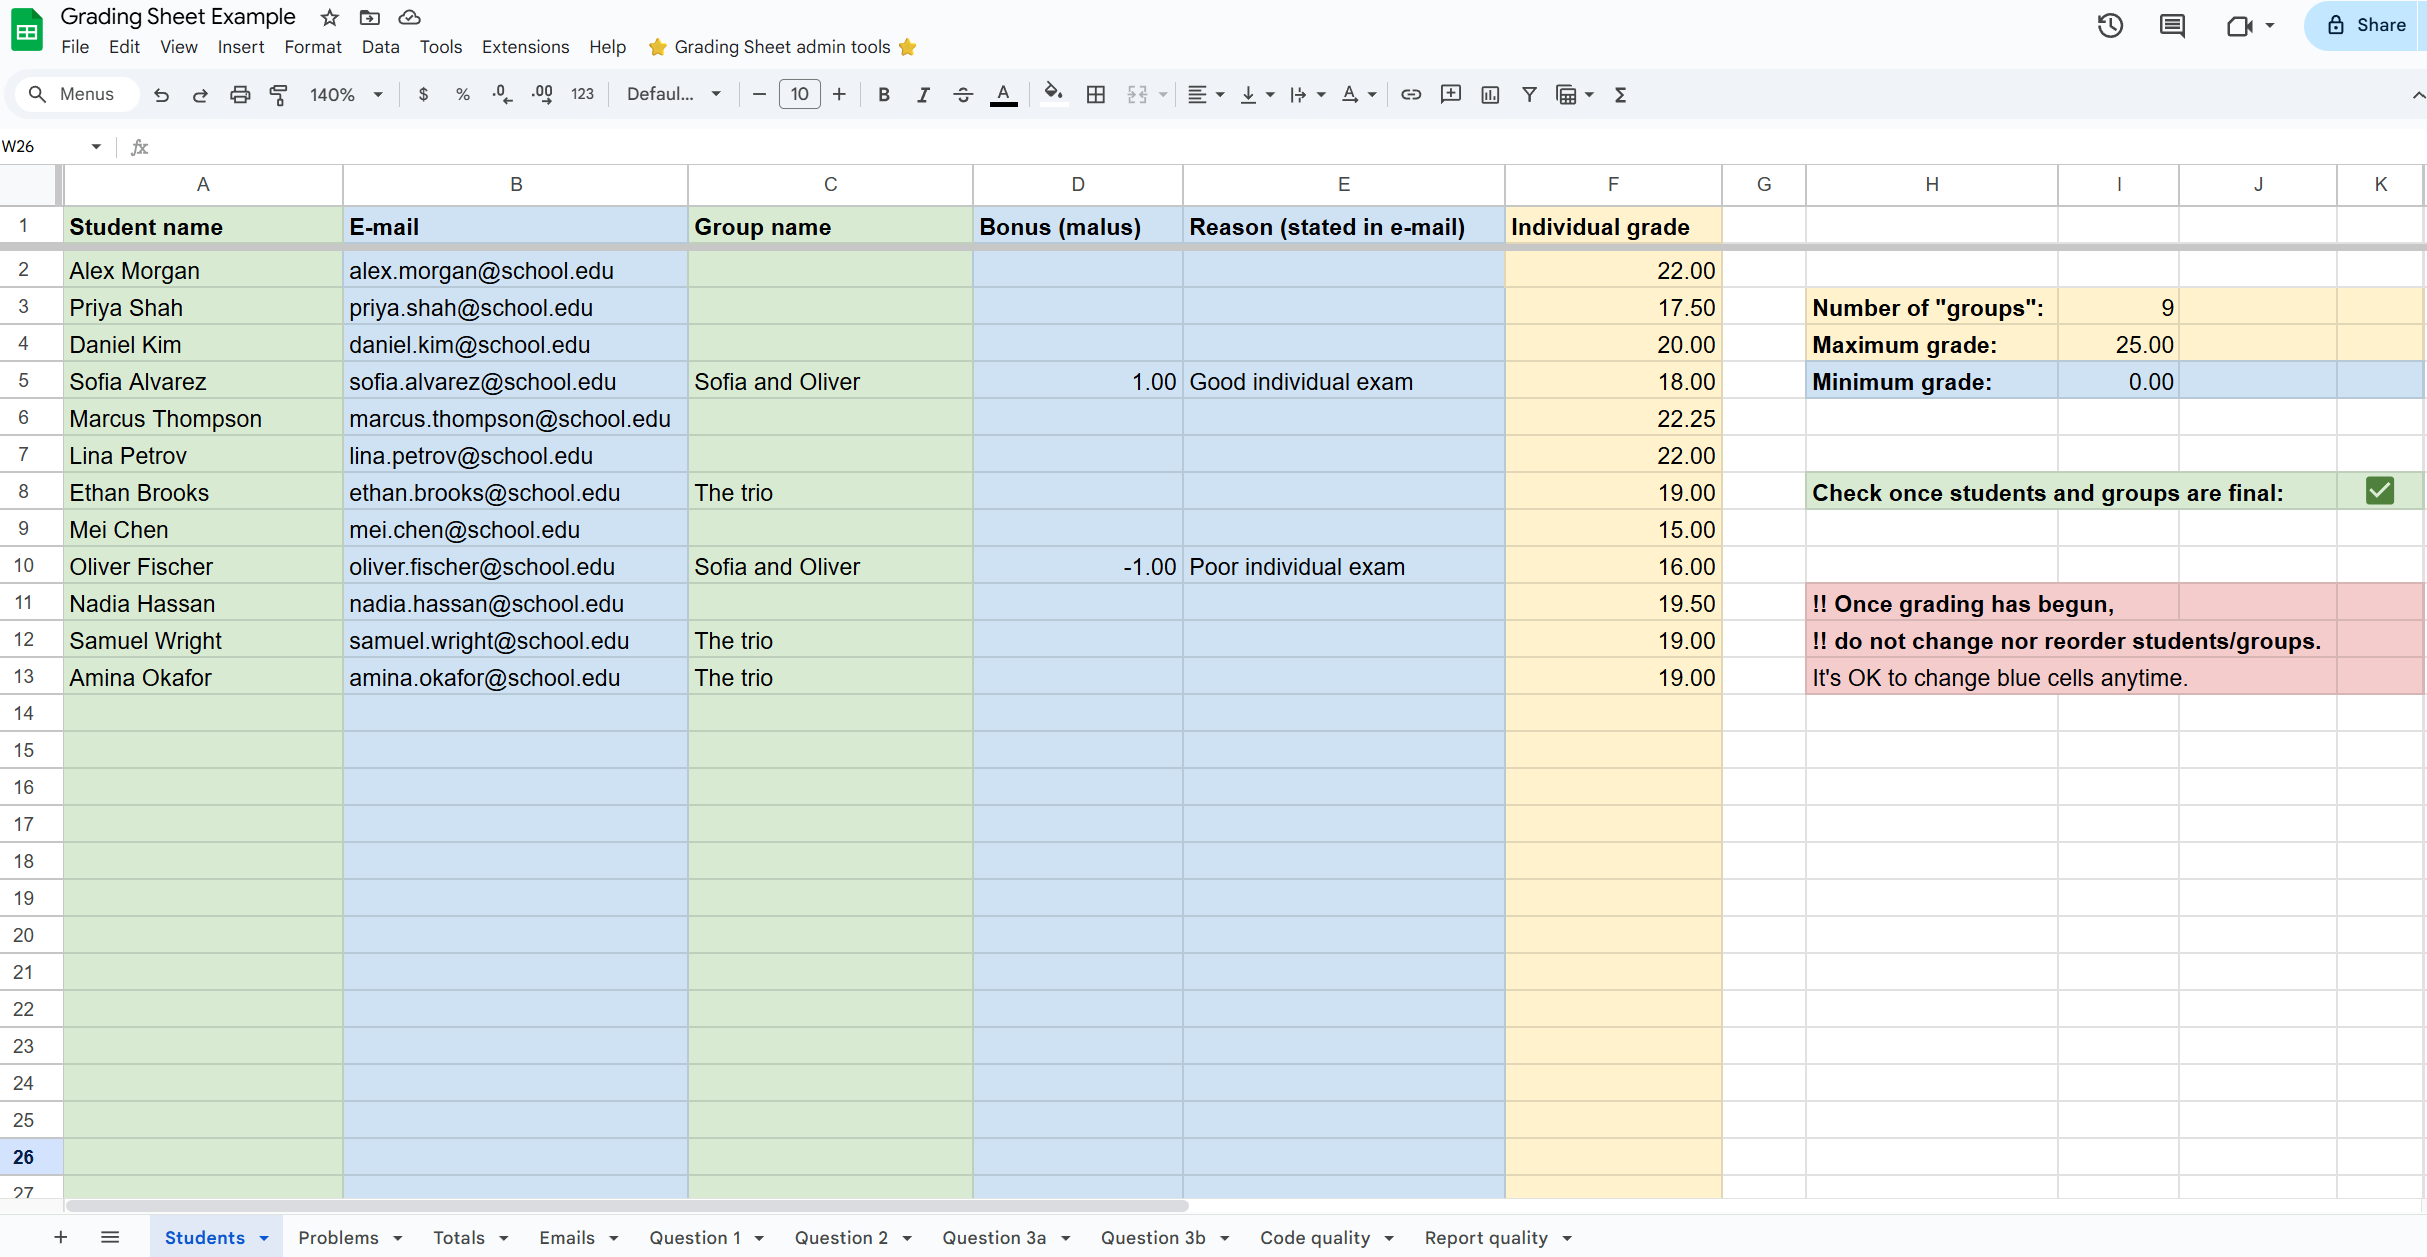
The first thing to do is list the student names in the Students sheet. Optionally, you may form groups by writing the same group name in the cells of the group’s members:
- Groups can have arbitrary sizes, and they may have different sizes.
- Student who are not part of any group are treated as if they were a group on their own, with the student’s name acting as the group name.
Once this is done, check the box (see screenshot). This reveals the Emails sheet (ignore for now).
Checking the box freezes the students/groups: it’s still ok to edit typos, but group compositions and student ordering should be kept fixed.
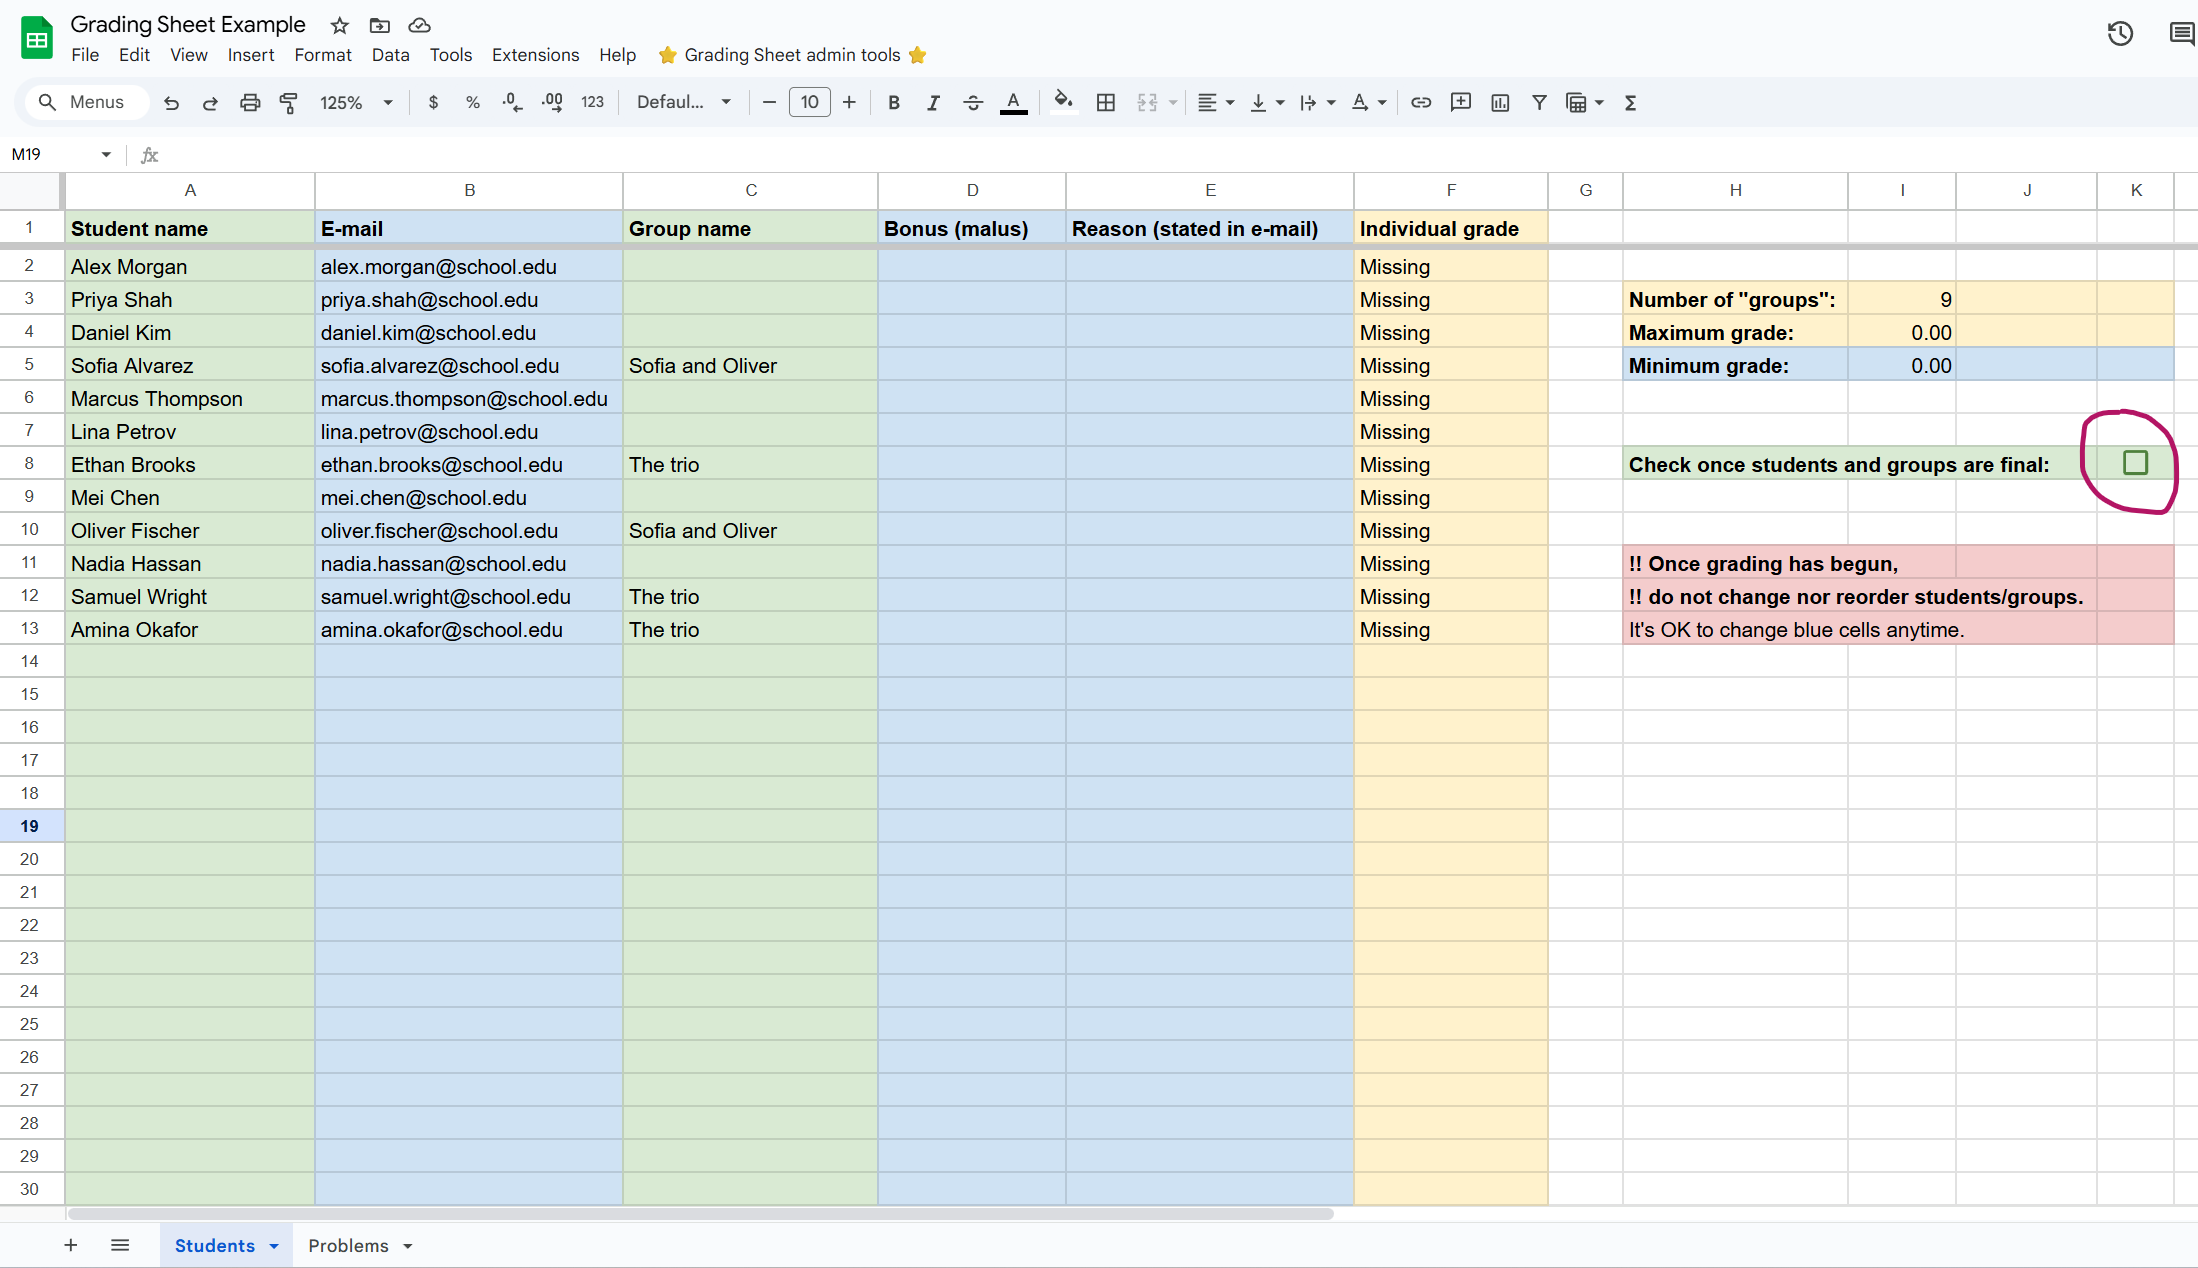
Students sheet. You may form groups. Check the box when done.
Setup: list problem names
The second thing to do is to list the problems / questions / grading categories in the Problems sheet.
Once this is done, check the box (see screenshot). This triggers the creation of one sheet per problem.
Time-outs. Google scripts triggered by a checkbox run for a maximum of 30 seconds, then they stop silently. It takes between 1 and 2 seconds to generate each sheet. Therefore, if you listed more than 15 problem names, you may find that after 30 seconds some of the problem sheets have not been generated. If so, check the box again, repeating as many times as needed.
Once all problem sheets have been created, the Totals sheet is revealed too (ignore for now).
You may at any point specify how many points each problem is worth. These can also be changed any time you want.
Note: problem sheets bear the names of the problems, so problem names should be valid sheet names: no duplicates, and no funny characters.
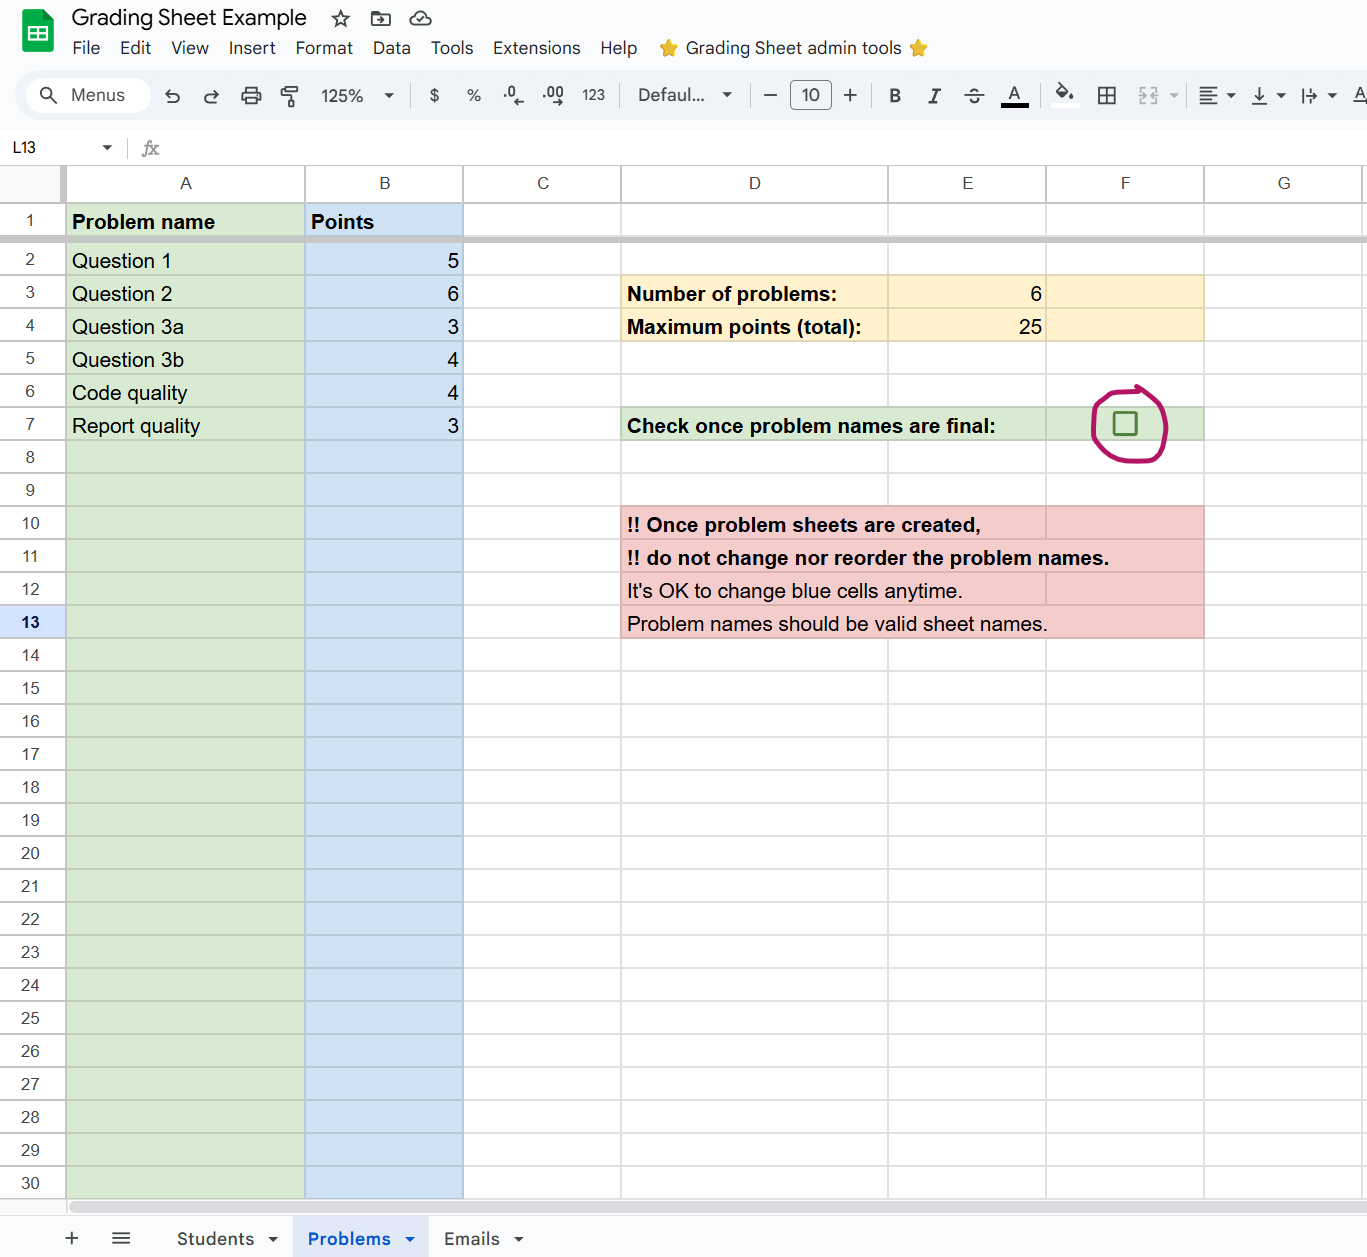
Problems sheet. You may also include grading categories that do not correspond to specific problems. Check the box when done. (If silent time-out after 30 seconds, check the box again.)
During grading
Grading can now start in earnest.
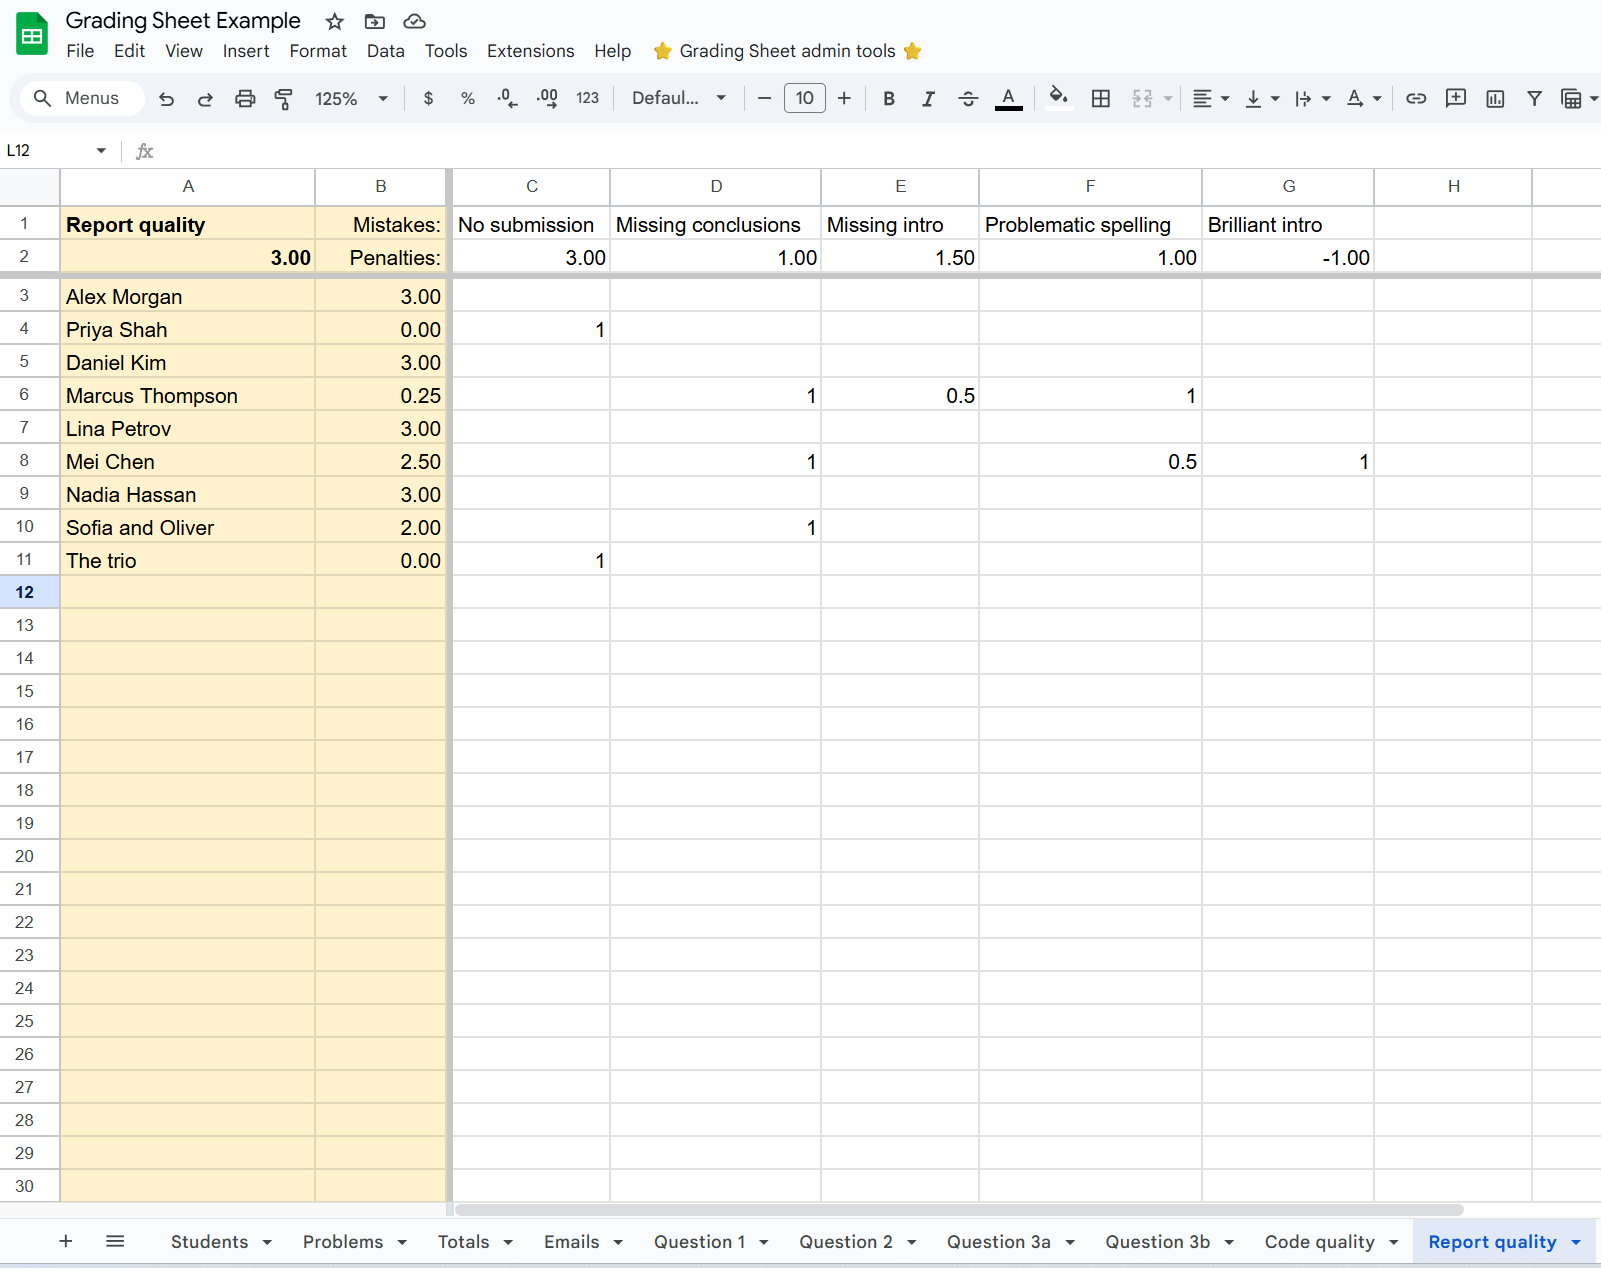
When grading a report, navigate to each problem sheet and locate the row corresponding to the current student/group. Mark the mistakes you found in that report by writing a 1 in the corresponding column of that row. If the mistake was only partial, you may write any other real number in the cell, such as 0.75 for example.
If they made a new type of mistake, create a new column: the mistake’s description goes into row 1 (not visible to students), and the associated penalty goes into row 2 (can be edited any time).
Occasionally, one may want to have “rewards” instead of penalties: just put in a negative penalty.
By default, each student/group’s grade for each problem is clipped between 0 and the max number of points allowed for that problem (visible in cell A2). If you really want to change that, carefully edit the formula in cell B3.
Once grading is done
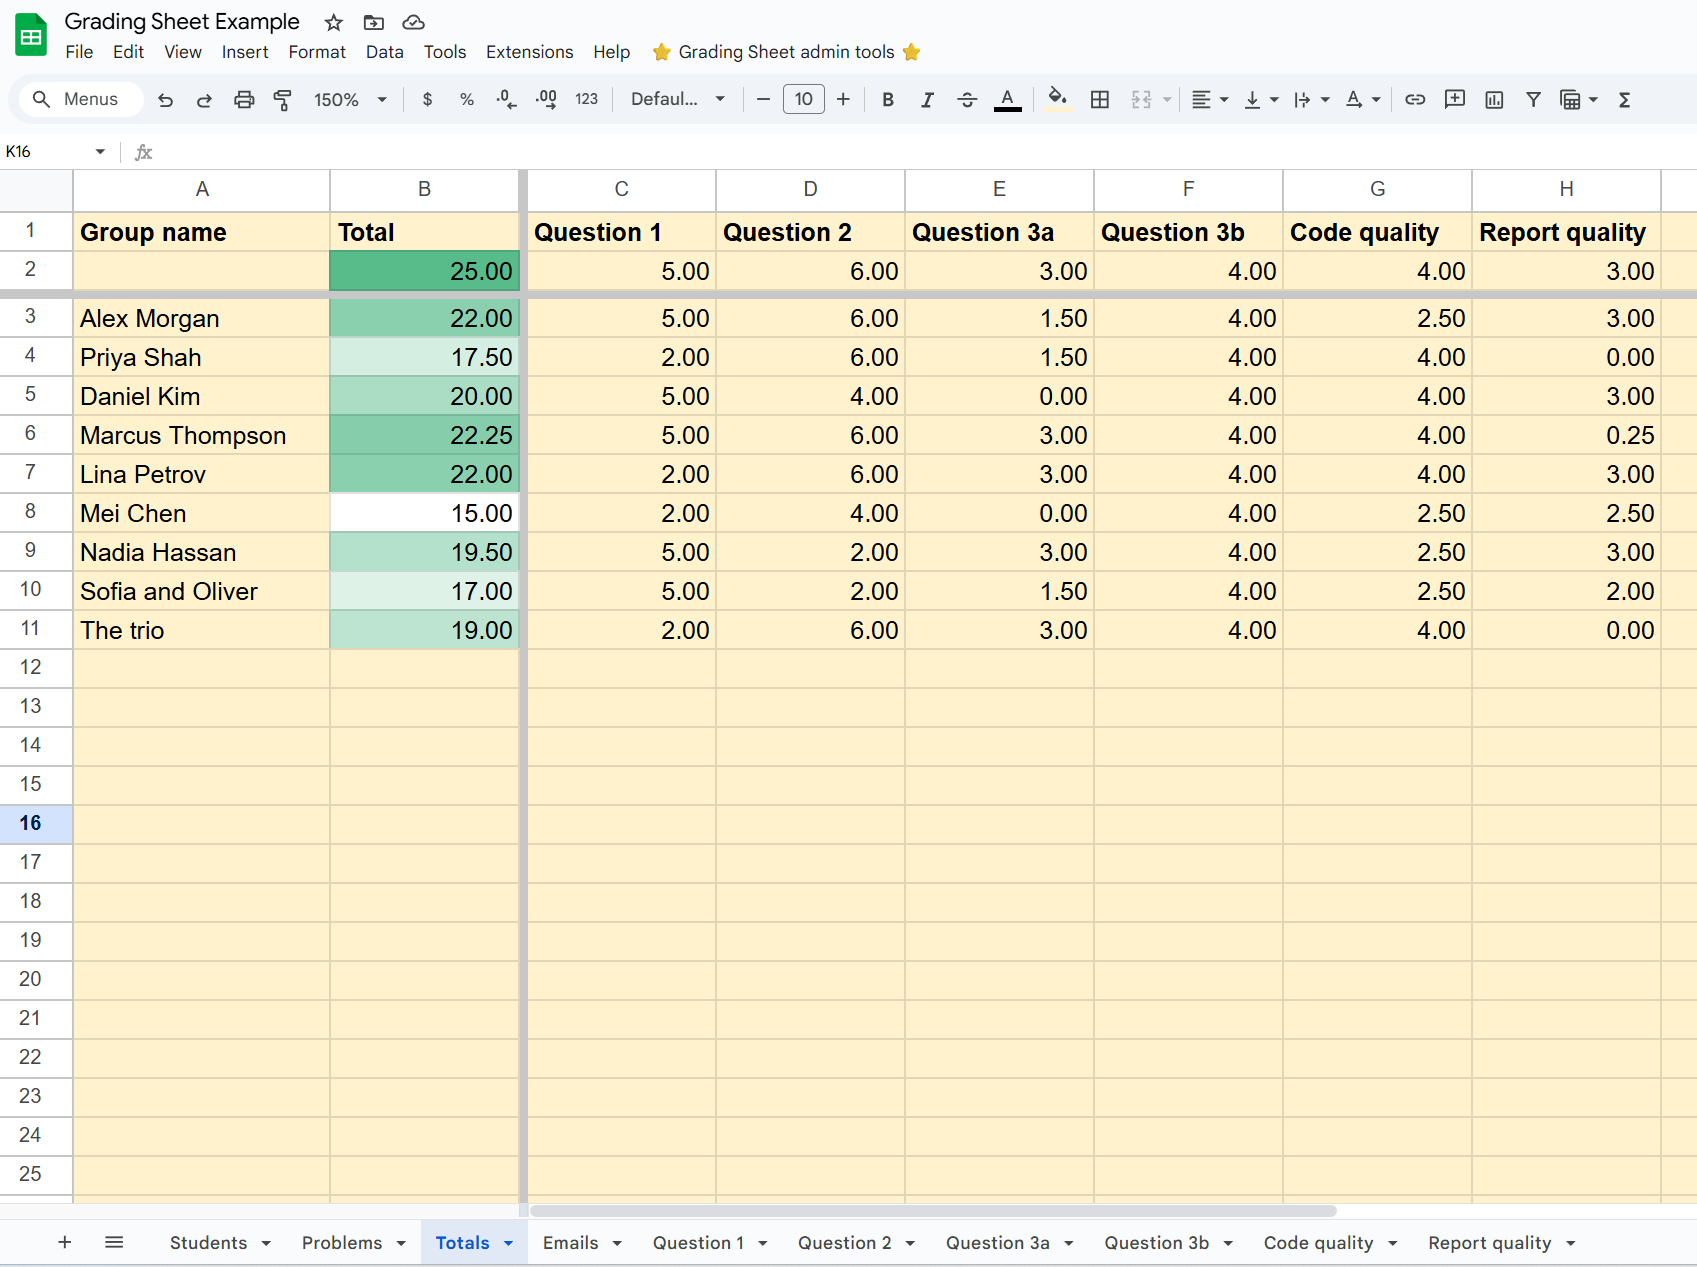
Go to the Totals sheet to review the overall grades: it’s good to start there for a discussion to fine tune the penalties, revisit the worst reports in case something was amiss, and understand how well the students did overall.
Here too, by default, each student/group’s total grade is clipped between 0 and the max number of points (visible in cell B2). If you really want to change that, carefully edit the formula in cell B3.
Once this settles, you can also go back to the Students sheet and (as the case may be) specify a bonus or a malus for individual students. This may be relevant for group work that includes an individual component such as an oral exam, or more commonly for late submissions etc.
This is also where you will find an easy-to-copy-paste list of individual students and their grades (conveniently unpacking groups that may change from one assignment to the next).
Once again, by default, each student’s total grade (after bonus/malus) is clipped between a min and a max number of points (visible in cells I4 and I5). If you really want to change that, carefully edit the formula in cell F2.
Students sheet after grading, e.g., to fill in e-mail addresses or tweak individual grades.
That’s it! The next step, if desired, is to send out e-mails.
Sending out the e-mails to students
When you are ready to return the grades:
- Make sure you listed student e-mail addresses in the
Studentssheet. - Go to the
Emailssheet. Consider modifying the blue cells in columnG. - Optionally, place a link in column
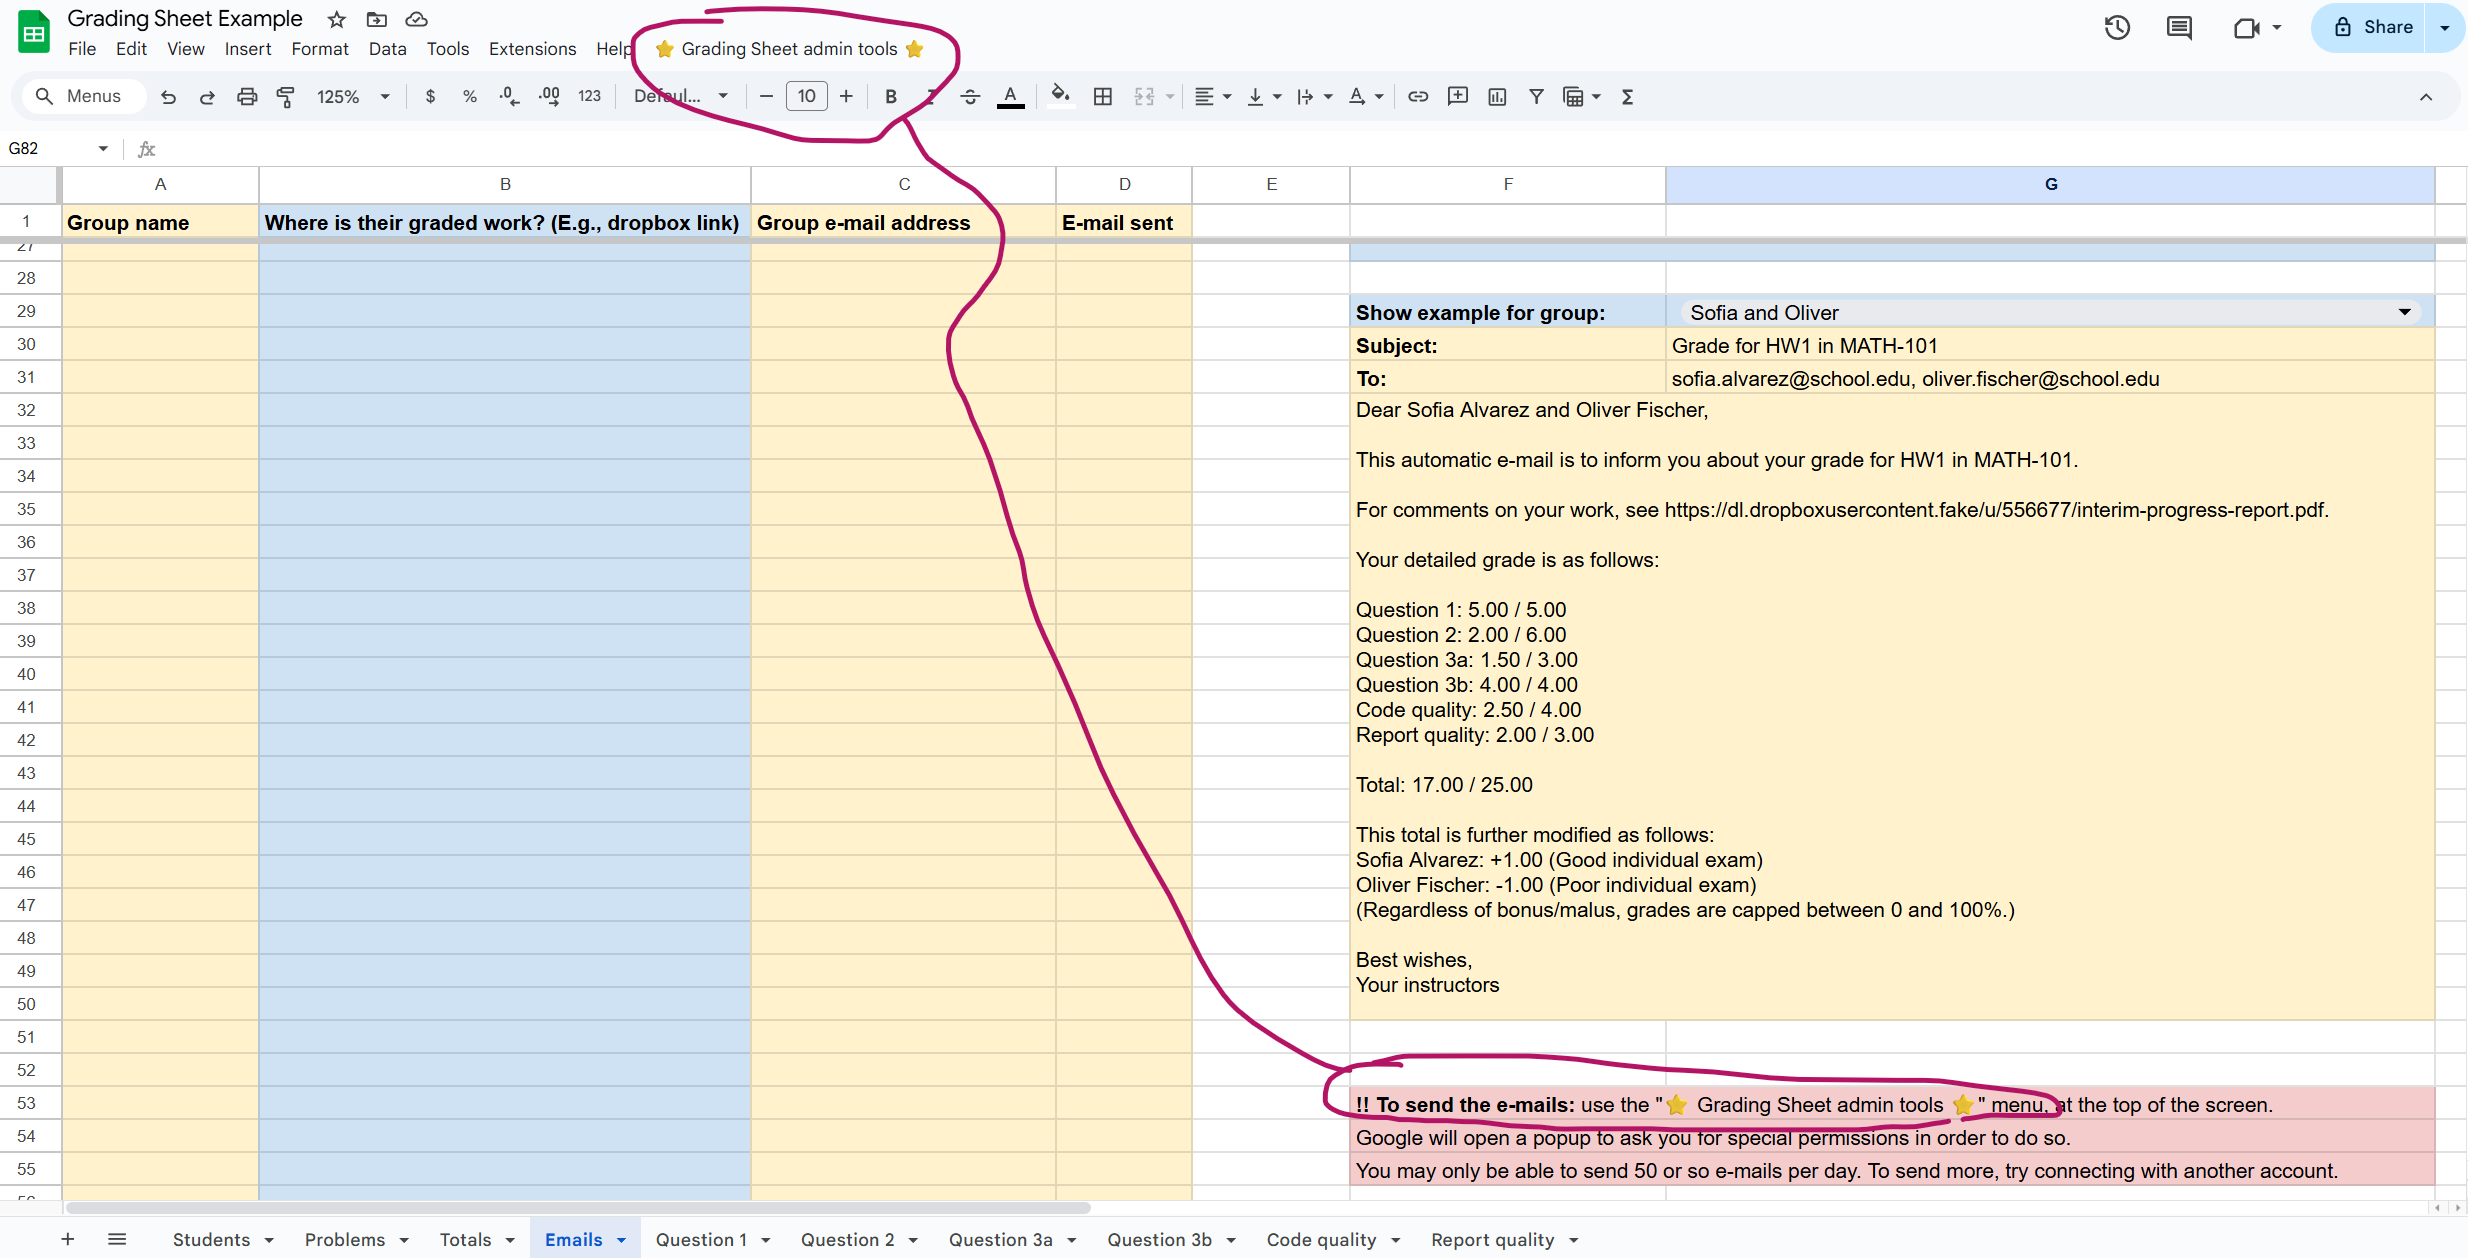
Bto each student/group’s graded report (typically, a PDF annotated with feedback). - For validation, select a group in cell
G29to see a live preview of the e-mail they will receive. - Use the Admin Tools menu (top of the screen) to select “Send / resume sending E-mails.” You will be asked to type “SEND” to confirm.
- The “E-mail sent” column will mark rows as
SENTas they go out.
If the script hits a limit or is interrupted, simply run it again (possibly after connecting with a different account, or waiting a day): it will skip anyone already marked SENT.
This also means that you can prevent a particular group from receiving an e-mail by simply writing SENT manually in their row. Likewise, if only a few select groups need to be re-sent the e-mail, simply delete the word SENT in their rows, and click to send those e-mails.
Note: the e-mail preview is slow, and it does not automatically reload when changes occur elsewhere.
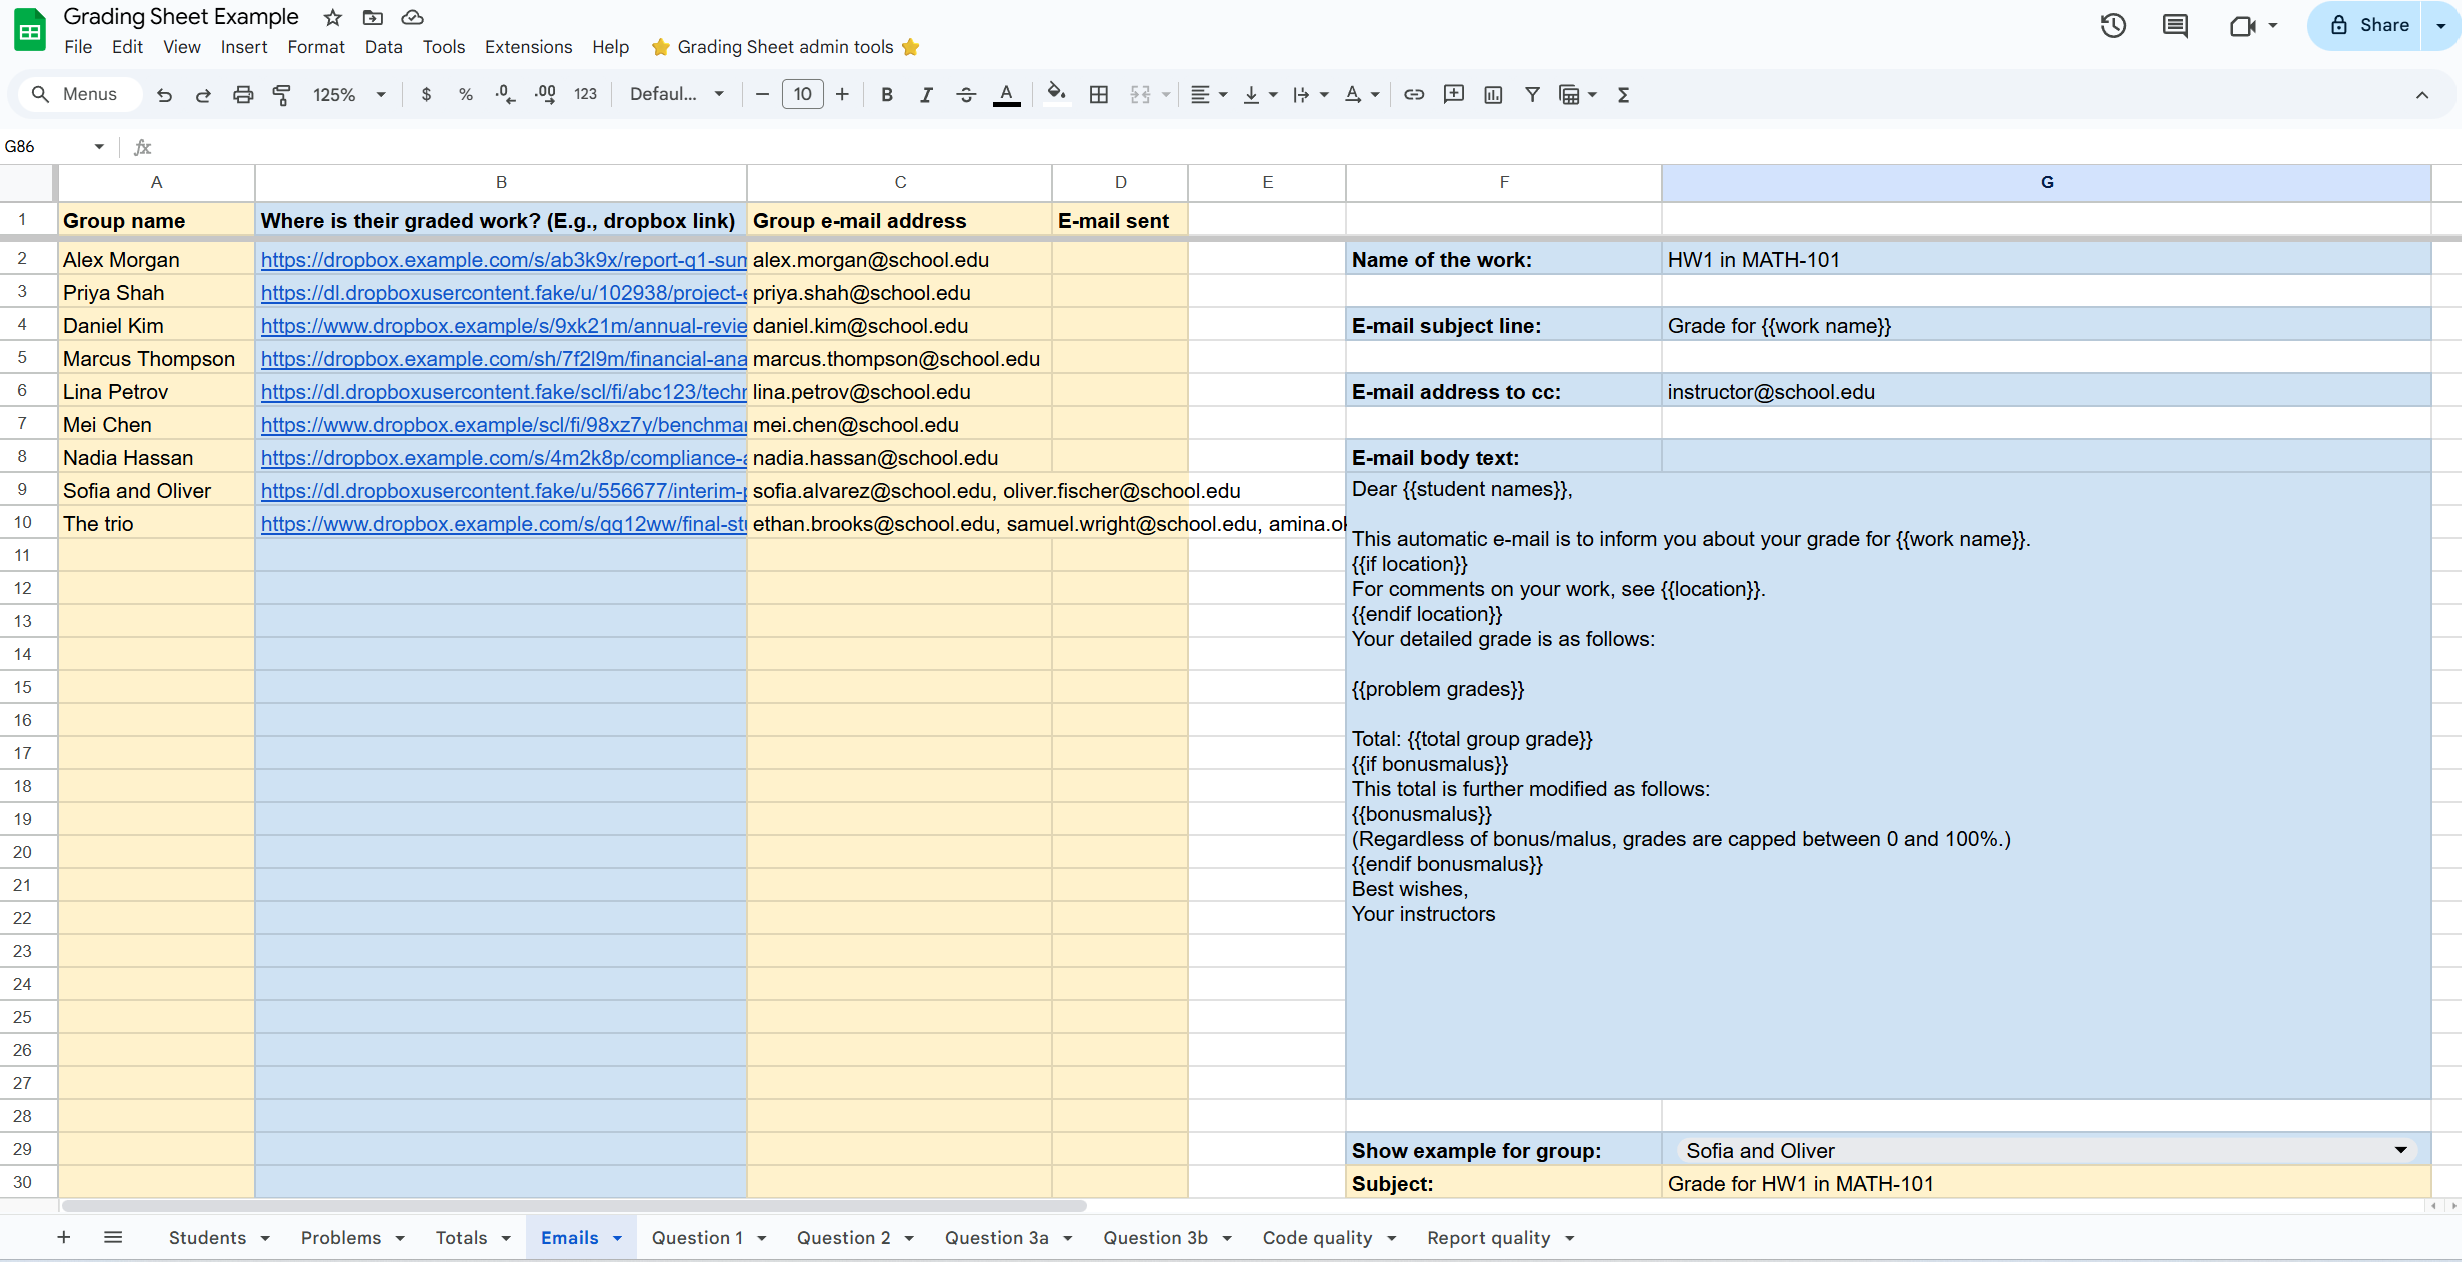
Emails sheet is for the very end. You may tweak the e-mail template here if you wish.
E-mail template formatting
The e-mail system uses a simple “Placeholder” logic. You can edit the body text in the Emails sheet using these tags:
{{student names}}: Lists the names of the / all students in the group (with commas and “and”).{{work name}}: The name of the assignment (see cellG2).{{problem grades}}: Generates a vertical list of every problem and the score achieved (the specific mistakes are not listed).{{total group grade}}: The final calculated score (before bonus/malus).{{location}}: An indication of where to find the work, e.g., a link to the report as a PDF with grader annotations (taken from columnB).{{bonusmalus}}: A list of students who received an individual bonus or malus, with associated details (taken from theStudentssheet).
About conditional logic:
- Text between the tags
{{if location}} ... {{endif location}}will only appear if an indication of where to find the work is actually given for that student/group. - Text between the tags
{{if bonusmalus}} ... {{endif bonusmalus}}will only appear if at least one student in the group actually has a nonzero “bonus/malus” entry.
A similar type of parsing is done for the e-mail subject line, though simpler.
Caveats and things to know
- Preserve consistency. Do not filter or sort rows, or otherwise manually move them around or delete any of them.
- Reset. The admin menu offers a way to reset the whole sheet. This cannot be undone. Maybe you’ll prefer simply making a new copy of the template.
- Permissions. The first time you run a command from the admin menu (like the Reset or Email scripts), Google will ask for permission. You must “Allow” these for the app to function.
- E-mail quotas. Google imposes a daily limit on the number of e-mails sent (usually 100 for personal accounts or 1500 for Workspace). If you hit the limit, you can connect to the sheet from a different account and click the “send e-mails” button again: e-mailing will resume from where it left off.
- Grades are clipped. By default, problem grades and total grades (including bonus/malus) are clipped between 0 and the maximum number of points of each problem / the whole assignment. You can change this behavior by editing the formulas (read above).
- Tinkering. Problem sheets are created by duplicating the hidden
Template_sheet. Feel free to experiment with modifying it, e.g., if you want a “rewards-first” system rather than a “penalties-first” system.
How this was made
This system started as a “minimum viable product” hand-coded in 2019. It evolved over the years as the needs became more clear and new use-cases arose.
Eventually, LLMs became a thing and suddenly it seemed like it would be painless to rewrite the whole thing from scratch “the way it should have been” with the benefit of hindsight (thanks to Antoine Gonon for planting that seed!). That’s exactly what happened: Gemini and I co-wrote a basic version from scratch in a couple of evenings. You can read the Google Apps Scripts behind it all on Github.
Students!F2, Totals!B3 and ProblemName!B3 (or Template_!B3).It was fun, I learned a ton, and the new version is just better than what I had put together originally.
Then, I thought… let’s also ask Gemini to write this blog post. But that was terrible, so, back to human-crafted words. For now. Good.